
Game Information
TIO Stadium
| fourth Quarter | |||
|---|---|---|---|
| Time | Team | Play | Score |
| 11:13 |  | L. Lombard Behind | 69 - 53 |
| 8:36 | | C. Petracca Behind | 68 - 53 |
| 6:58 | | L. Lombard Goal | 67 - 53 |
| 6:04 |  | M. Hall Behind | 61 - 53 |
| 2:13 | | D. Wilson Goal | 61 - 52 |
| 0:53 | | B. Humphrey Behind | 61 - 46 |
| third Quarter | |||
| Time | Team | Play | Score |
| 26:28 | | L. Weller Behind | 60 - 46 |
| 24:25 | | N. Moyle Behind | 59 - 46 |
| 21:14 | | B. King Goal | 58 - 46 |
| 19:50 | | Rushed | 52 - 46 |
| 18:36 | | D. Wilson Goal | 52 - 45 |
| 17:16 | | B. King Goal | 52 - 39 |
| 12:54 | | D. Wilson Behind | 46 - 39 |
| 3:41 | | A. Caminiti Behind | 46 - 38 |
| 0:55 | | C. Sharman Behind | 46 - 37 |
| second Quarter | |||
| Time | Team | Play | Score |
| 26:24 | | J. Ugle-Hagan Behind | 46 - 36 |
| 24:01 | | A. Davies Goal | 45 - 36 |
| 22:24 | | L. Henry Behind | 39 - 36 |
| 21:13 | | Rushed | 39 - 35 |
| 19:45 | | D. Rioli Goal | 39 - 34 |
| 16:09 | | T. De Koning Behind | 33 - 34 |
| 13:31 | | M. Phillipou Behind | 33 - 33 |
| 11:16 | | W. Graham Goal | 33 - 32 |
| 9:46 | | B. Long Behind | 27 - 32 |
| 8:30 | | J. Noble Goal | 26 - 32 |
| 7:13 | | L. Weller Goal | 20 - 32 |
| 4:06 | | Rushed | 14 - 32 |
| 2:57 | | C. Petracca Goal | 13 - 32 |
| first Quarter | |||
| Time | Team | Play | Score |
| 25:30 | | D. Wilson Goal | 7 - 32 |
| 23:43 | | R. Marshall Behind | 7 - 26 |
| 22:08 | | L. Henry Goal | 7 - 25 |
| 20:33 | | D. Wilson Goal | 7 - 19 |
| 19:25 | | Rushed | 7 - 13 |
| 16:57 | | M. Owens Goal | 7 - 12 |
| 14:09 | | M. Hall Goal | 7 - 6 |
| 5:45 | | J. Ugle-Hagan Behind | 7 - 0 |
| 2:38 | | B. King Goal | 6 - 0 |
Port Adelaide superstar Zak Butters has avoided an AFL suspension, keeping him in Brownlow Medal contention.
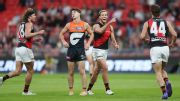
Sam Durham provides the clever tap that leads to a Darcy Parish goal.
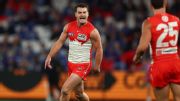
Tom Papley's forward craft was on full display, with the Sydney livewire slotting two clever goals from sharp reads.
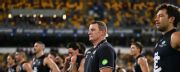
Carlton have flirted with a second Gabba miracle in three seasons before Michael Voss's men fell to a seventh straight AFL loss.
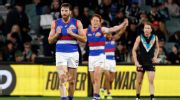
Western Bulldogs coach Luke Beveridge has seen his captain Marcus Bontempelli be a match-winner so many times, it's almost normal.
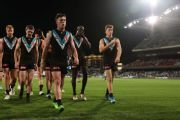
The Western Bulldogs have banked a dramatic two-point victory over Port Adelaide to climb into the AFL's top eight.
| POS | Team | Pts. | % | Form |
|---|---|---|---|---|
| 1 |
 SYD SYD
|
32 | 157.2 | WWWWW |
| 2 |
 FRE FRE
|
32 | 131.6 | WWWWW |
| 3 |
 HAW HAW
|
26 | 116.8 | WWWDL |
| 4 |
 BL BL
|
24 | 124.5 | WLWWW |
| 5 |
 SUNS SUNS
|
20 | 116.0 | LLWLW |
| 6 |
 GEEL GEEL
|
20 | 114.6 | LWWLW |
| 7 |
 MELB MELB
|
20 | 100.2 | WLWWL |
| 8 |
 WB WB
|
20 | 92.4 | LLLLW |
| 9 |
 COLL COLL
|
18 | 108.6 | LLWWD |
| 10 |
 STK STK
|
16 | 114.9 | LWLWW |
| 11 |
 NMFC NMFC
|
16 | 104.4 | LWLLL |
| 12 |
 ADEL ADEL
|
16 | 96.6 | LWWLW |
| 13 |
 GWS GWS
|
16 | 91.1 | WLWLW |
| 14 |
 PORT PORT
|
12 | 109.5 | LLWLL |
| 15 |
 WCE WCE
|
8 | 59.3 | LLLLL |
| 16 |
 CARL CARL
|
4 | 79.3 | LLLLL |
| 17 |
 ESS ESS
|
4 | 71.8 | WLLLL |
| 18 |
 RICH RICH
|
4 | 60.0 | LLLLW |